Have you watched the webinar ‘Get to know the cloud capabilities of Trados Studio 2022’ and trawled through the available information, yet still can’t quite figure out the cloud version?
Let us help. As a LSP we were accustomed to working with the desktop version of Studio, and when cloud capabilities were introduced as part of the 2021 edition of Studio, we looked into ways to incorporate the cloud into our existing workflows. Granted, the cloud version doesn’t have all of the same features and capabilities as desktop Studio, but it could still be useful for you as an outsourcer or small team.
Trados’ tutorials, although they may mention LSPs, translation teams and even in-house translation departments, do not effectively show how to import files translated externally into the online or ‘cloud’ version. If you choose to ‘add files’ you end up with another source file. There is no ‘add translation’ button, and it’s not clear how to add any translations that you haven’t done yourself. You can easily add TMs and termbases, but how do you add a translated xliff to your project?
The key is to understand that the cloud version is not simply translation software, but also a project management tool which enables collaborative working. The cloud version for a single license version of Trados Studio is very similar to Trados Team.
The main differences between Team and Studio are that Team allows multiple users to share the same resources and assign tasks to other users on the team. Team also has a nifty feature where you can email someone a link which allows them to open up the cloud editor and translate a file, all without the person needing Studio software or a license.
The cloud version of Studio looks like Team, and works pretty much in the same way, except as a single license user it automatically assigns the task to you – the only user. So, what to do when you want to send a file to someone else to translate and you want to review it in the editor? Or if you want to outsource both the translation and review, and you simply want to ‘verify’ and finalise the file to generate a target version? It’s not obvious.
Desktop vs cloud workflow
Let’s start by looking at a very basic workflow for exporting and importing files with the desktop version of Studio.
With Studio, when source files are added to a project, sdlxliffs are automatically generated and saved in a folder on the local machine. You can send these sdlxliffs off to someone else to translate. When you receive the translated files, save them over the original export and voilà – when you open the file in Studio’s Editor you see the translation. Repeat this process for multiple review stages. When you want to download the final translated version, you choose ‘finalise’ or ‘export’ and then Trados will save the target file in the same folder as your sdlxliff. Simples.
Now, let’s consider the cloud version for a single license holder, and how you can access the files you need at each stage of the process.
Accept the task
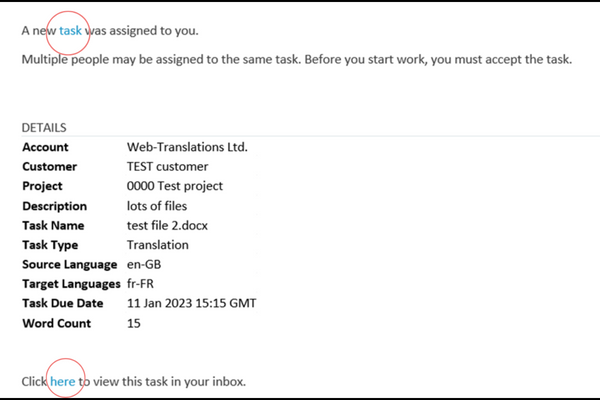
You must begin with accepting the translation task, which the cloud version will automatically assign to you. When you start a project, you will receive 2 emails from Studio. These are sent to the email address associated with your Trados account. The first says ‘You have a new project in Trados’ and the second one says ‘New tasks are assigned to you’. You can click the link on the word ‘task’ or ‘here’ in the second email and it will take you to the ‘Inbox’ in the cloud version.
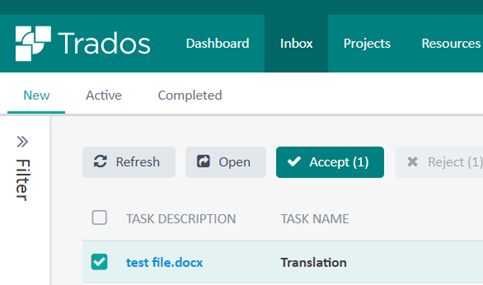
Alternatively, you can find the Inbox in the top green banner after you’ve logged in. Tick the files you want and then click the green ‘Accept’ box or click on the file to see more info and you’ll also see a green ‘Accept’ box.
Download the sdlxliff
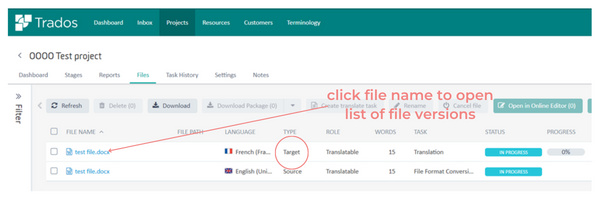
After you have accepted a task/file, when you go back to the project’s ‘Files’ tab you will now have a ‘Target’ file in your list of files. Click on the name of the target file and a list of file versions will open at the right side of the interface; you can download a sdlxliff from that list.
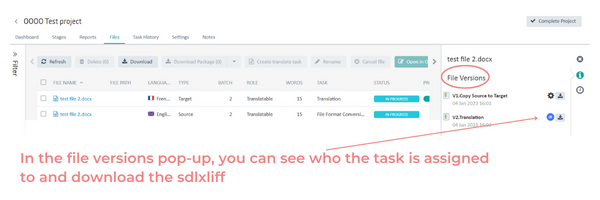
Each file in the ‘Files’ tab has different file versions for that particular file. The source file’s V1 is the source file itself. V2 is an xliff. The target file’s V1 is the untranslated xliff with the source copied to the target segment. V2 is the translation, which will be the same as V1 if you haven’t edited it yet.
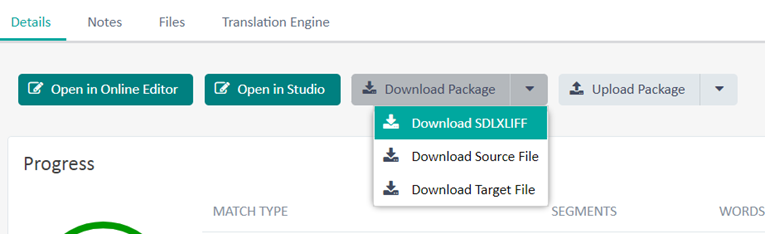
Also, if you click on the file in the Inbox, under the ‘Details’ tab, the ‘Download Package’ dropdown has the option to download the sdlxliff. However, there is no .ppx package as you’d expect in desktop Studio. (Oddly, there are other places in the online version where ‘Download Package’ does generate a .ppx, but not here!)
Upload the sdlxliff
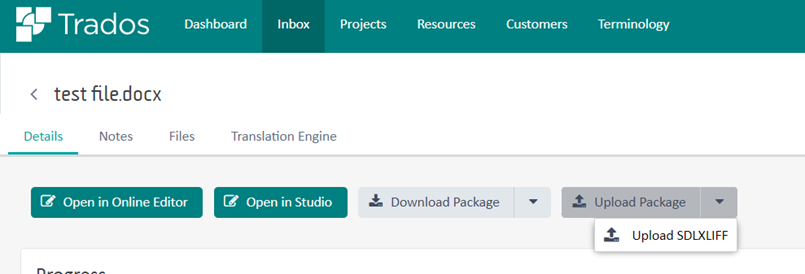
If you have sent the sdlxliff to an external linguist, and now need to upload it, click the ‘Upload Package’ dropdown, where you can select the ‘Upload SDLXIFF’ option.
If you head back to the ‘Files’ tab, then click on the file name, you will now see a V3.Import in the File Versions. This is also a sdlxliff.

Now that you’ve uploaded the translation, you can open the file in the Online Editor. You can also download and upload new versions of the file in the same way.
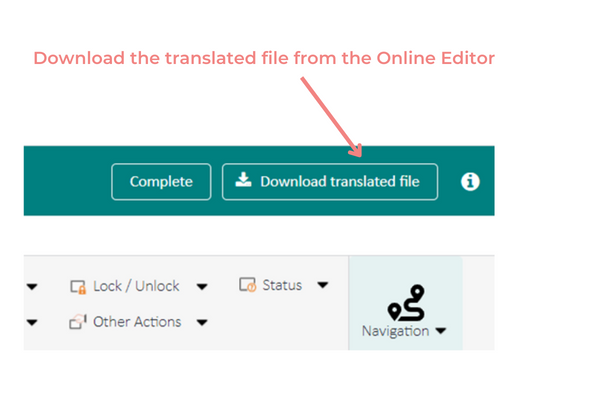
From the Online Editor, you can quickly download the target translated file by clicking ‘Download translated file’ at the top right. No need to finalise as you would in desktop Studio.
Feel free to tick the file as ‘Complete’ to keep things organised!
After you’ve completed the file, you won’t be able to edit it on the Online Editor, so go back to ‘Files’, where you can tick the file and click ‘Download’.
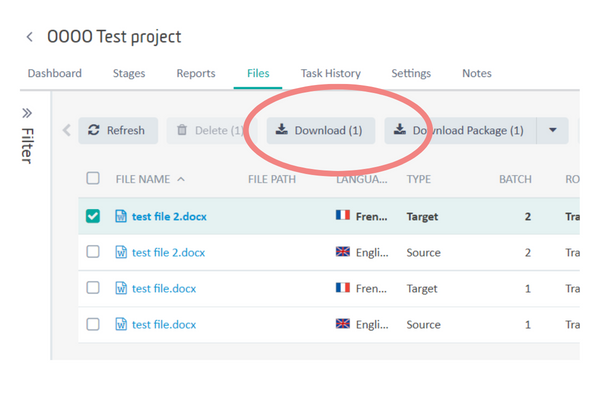
You can choose to download the current version (sdlxliff), native version (source format), or only completed files (this is also the source format). However, if you have marked the file as complete, you will no longer have the option here to download the current and native versions, but only the ‘completed files’.

Trados’ cloud – our thoughts
As a LSP, we’ve found it best to continue to use desktop Studio almost exclusively. The cloud is missing key functionalities which are integral to our processes, plus with Studio it’s easier for us to maintain TMs and termbases and ensure these are sent out to linguists with assignments. We do occasionally use the cloud and can see how it could be more useful for freelancers and small teams. We’ve found the method detailed in this post to be a simple way to download and upload translated xliffs; essential for outsourcing translations when working with the single user cloud version of Studio.
9 January 2023 13:30